Marine Tool Storage Solutions: Corrosion-Resistant Design
By Priya Desai • 6th May
Marine tool storage solutions demand far more than a standard roll-away cabinet. Corrosion-resistant tool chests aren't a luxury upgrade (they're a baseline requirement) for anyone working near saltwater environments, whether you're a marine technician, a field service professional maintaining dock equipment, or a shop owner expanding into coastal operations. The difference between a chest that lasts five years and one that fails in eighteen months often comes down to one variable: did the storage system treat corrosion prevention as a design principle from day one, or as an afterthought?
I've spent years standardizing tool storage across bays (shipyards, automotive shops, diesel facilities, makers' labs). The pattern is consistent: teams that succeed aren't the ones with the fanciest chests or the most tools. They're the ones who lock in a repeatable system. Same place, every time. And when that system is designed for saltwater corrosion protection from the ground up, the payoff isn't just cleaner tools (it's measurable uptime, faster diagnostics, and the confidence that a critical tool won't seize mid-job).
This listicle walks you through building that system: how to select the right materials, organize by corrosion risk, standardize across bays, and create the checks that keep your marine tool storage solutions running strong.
1. Audit Your Baseline: Measure Corrosion Risk and Current Losses
Before you invest in a new chest or retrofit your current one, measure what's failing. Most shops I work with discover they've lost money twice: first to corroded tools, then to downtime searching for replacements they had to buy.
Your audit checklist:
- Walk each bay and document rust blooms, seized drawers, or corroded hinges on existing cabinets
- Interview two to three techs on their worst corrosion pain point this month
- Count how many tools have been replaced due to salt-spray damage in the last six months
- Time a tech finding a frequently used tool (wrench, socket, diagnostic probe) from the moment they step away from the work
- Establish a before baseline: current setup, time-to-tool average, and monthly rust-related losses
Record this in a one-page template. You'll return to it after your first month with the new system to confirm gains. Before/after baselines aren't optional (they're how you prove the system works and earn buy-in from skeptics on the team).
2. Select Corrosion-Resistant Materials: Stainless Steel, Powder-Coat, and Sealed Joints
Saltwater corrosion protection isn't vague. It's a specification. When you're shopping for a chest, demand clarity on three material components: For material trade-offs and weight-versus-durability details, see our steel vs aluminum tool chest comparison.
Steel Grade & Finish:
- Stainless steel (AISI 304 or 316) for frames, fasteners, and slide hardware. 304 handles most shop environments; 316 is the standard for direct saltwater exposure.
- Powder-coat finish on cabinet bodies (15-25 mil thickness minimum). This creates a barrier against salt spray and shop solvents.
- Electrostatic or hot-dip galvanizing on fasteners and undercarriage if mild steel is used.
Drawer Seals & Gaskets:
- Silicone or EPDM gaskets around drawer fronts reduce dust and salt-laden air infiltration
- Full-extension slides with sealed bearings prevent grit from grinding away the lubricant
Hinges, Handles, Casters:
- Stainless steel or chrome-plated hardware throughout
- Casters with sealed ball bearings and stainless axles
- Handles that won't pit or corrode under sweaty gloves
Your specification template:
- Frame: Material and fastener grade
- Finish: Powder-coat mil thickness and adhesion testing standard
- Gaskets: Type and UV/solvent resistance rating
- Hardware: Stainless grade and locking mechanism
- Casters: Load rating per wheel, bearing seal type, material
Write this down and carry it when you're evaluating chests. Salespeople know vague claims work; specificity shuts down gray areas.
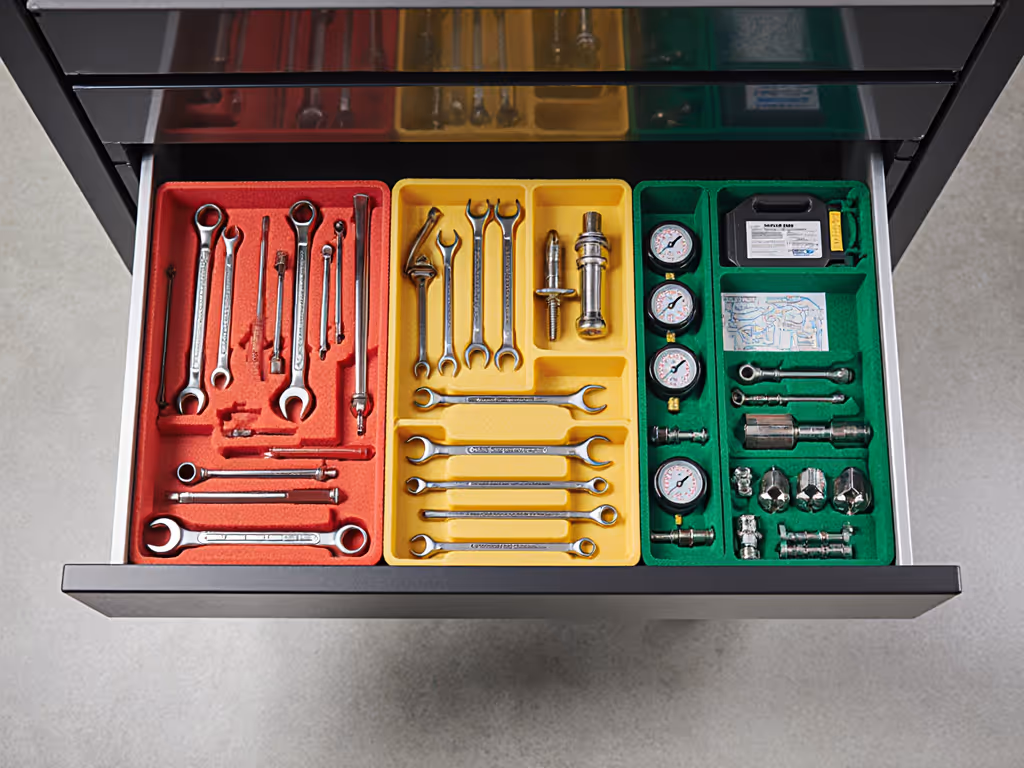
3. Color-Code by Corrosion Risk Zone and Function
Standardization begins the moment a tech opens the drawer. If every drawer looks the same and holds a different tool set, you've failed. Color-coding isn't decoration (it's a visual management layer that cuts confusion and shrinks setup time).
Divide your marine tool storage solutions into three zones by corrosion risk and usage frequency:
Red Zone (High-Risk, High-Use):
- Sockets, wrenches, diagnostic probes, and anything used daily
- Store in the top-most drawers closest to hand (10-second rule)
- Signal: Red drawer fronts or red foam inserts
- Reason: Highest corrosion threat and highest turnaround velocity
Yellow Zone (Moderate-Risk, Moderate-Use):
- Specialty wrenches, hose clamps, fasteners, electrical hand tools
- Store in mid-height drawers
- Signal: Yellow drawer fronts or yellow divider labels
- Reason: These tools spend more time in storage and experience variable humidity
Green Zone (Low-Risk, Seasonal or Specialized):
- Pullers, bushings, measurement tools, documentation
- Store in lower or rear drawers
- Signal: Green labels or lower cabinet position
- Reason: Infrequent use allows natural rotation and inspection
Documentation layer (Critical):
- Laminated zone map mounted on the chest front
- Include a photo of the zone layout and a list of what goes where
- Use waterproof labels rated for saltwater environments and shop solvents
- Review and refresh labels every 90 days during your reset window
This color scheme isn't arbitrary. I worked with a multi-bay marine facility where every tech kept a different tool in a different drawer. One tech was late by 15 minutes most days. Not because he was slow, because every chest was a puzzle. We standardized zones, colors, and labels, and wrote a 10-minute reset. The next month, cross-bay coverage became automatic. Techs didn't have to relearn; they just followed the map.
Standard bays beat heroics on any busy Monday.
4. Design Vibration-Resistant Marine Storage Layouts
Vibration-resistant marine storage sounds technical, but the principle is simple: a tool that shifts during transit or under engine vibration corrodes faster (exposed faces), arrives at the job already compromised, and creates workflow friction (tech stops to reseat it).
Layout rules for vibration resistance:
Drawer-Load Distribution:
- Front third: 40% of drawer capacity (most frequently accessed tools)
- Middle third: 35% of capacity (moderate-access tools, dividers, shadow foam)
- Rear third: 25% of capacity (specialty or infrequently rotated tools)
- This prevents top-heavy tipping and reduces slide wear
Tool Nesting & Restraint:
- Use closed-cell foam inserts (3/8" to 1/2" thickness) for high-vibration environments
- Nest sockets, wrenches, and probes so they can't roll or clatter
- For cordless tools and batteries, use custom foam with rubber edge guards and non-slip pad bases
- Label the foam cutout with the tool name and part number so shadow audits are instant
Caster Selection for Deck & Galley Work:
- Minimum 4" diameter casters with swivel locks (prevents unintended drift)
- Sealed ball bearings rated for salt-laden environments
- Load rating: at least 125% of the fully loaded chest weight
- Test roll under full load on your target surface (teak, composite, non-skid) to confirm smooth motion
Your vibration-resistance checklist:
- Drawer load distribution follows 40/35/25 rule
- Foam is closed-cell and rated for marine environments
- All foam cutouts are labeled with tool name and part number
- Casters lock securely and roll smoothly under full load
- Drawers close gently without slamming (soft-close slides if available)
5. Integrate Boat Maintenance Organization Principles
Boat maintenance organization differs from shop organization in one critical way: you don't always have a flat, stable surface, and tools must be retrievable in confined spaces under variable lighting. For stability and tip-over prevention guidelines, review our tool chest safety and weight distribution guide. Your nautical tool solutions must account for angle, weather, and the high cost of a dropped wrench into a bilge.
Three design adaptations:
Tilt Resistance & Footprint Stability:
- Choose a chest with a center of gravity at or below mid-height (not a tall, narrow design)
- Verify the footprint is at least 70% of the height to width ratio (Example: a 48" wide chest should be no taller than 54-60")
- Add deck plates or rubber feet with non-slip pads if the vessel moves
Quick-Access Lid & Worktop Design:
- Lid hinges must support open-door diagnostics (laptops, tablets, manuals)
- Look for lids with gas struts that stay open and don't require propping
- A clear, flat worktop surface on the lid allows organizing small parts during a repair
Drain Holes & Ventilation:
- Marine chests need small weep holes (1/8") in the bottom rear to prevent standing water and mold
- Ensure ventilation around cordless battery charging to prevent thermal runaway
- Position the chest away from direct bilge spray or engine compartment heat
Corrosion-resistant fasteners everywhere:
- Stainless steel hardware for any external fastener or clip
- Check all hinges, latches, and handle screws monthly for micro-corrosion
6. Lock In Your System with Audit Checklists and Reset Windows
A great system decays without governance. The moment you assume consistency will sustain itself, you're inviting the junk drawer effect back in.
Monthly Audit Checklist (15 minutes per chest, per tech):
- Walk the color zones. Are tools in their labeled home?
- Check for corrosion blooms or rust specks on tools or foam
- Inspect drawer slides for smooth operation (no grinding or sticking)
- Verify gaskets are seated and not cracked or peeling
- Confirm all fasteners are tight (hinges, handles, casters)
- Look for salt deposits or spray residue on the exterior and wipe with fresh water
- Spot-check five high-use drawers for missing tools
Reset Window (10 minutes every Friday afternoon):
- All tools returned to same place, every time
- Foam inserts checked and replaced if compressed or damaged
- Labels refreshed or replaced if fading (laminated labels last 6-12 months in marine environments)
- Chest exterior wiped down with a soft cloth and distilled water
- Casters tested for smooth roll and locks confirmed engaged
Quarterly Deep Audit (30 minutes):
- Every Q, one tech and one supervisor audit the chest together
- Compare current tool inventory to the documented baseline
- Flag missing tools, outdated procedures, or corrosion escapes
- Update the zone map and shadow foam if tool sets have evolved
- Document the audit date and sign off (creates accountability)
This isn't bureaucracy (it's the mechanism that turns a one-time win into a repeatable standard that survives schedule chaos and new hires).
7. Train Your Team and Scale Across All Bays
Consistency only scales if every tech knows the standard and owns it. A single "hero" tech who knows the perfect tool location doesn't help when that tech is off sick or promoted.
Your 5S training template (new tech onboarding):
Day 1 (30 minutes):
- Walk the color zones with a veteran tech
- Practice the 10-second rule: retrieve five different tools from each zone, timed
- Review the laminated zone map and shadow foam layout
- Show the monthly audit checklist and explain why it matters
Week 1 (5 minutes daily):
- Shadow a veteran tech doing reset
- Ask: "Why does this tool live in this zone?"
- Retrieve and return tools 20 times with feedback
Week 2 (independent practice):
- New tech does a full reset on Friday afternoon with a check-in
- Supervisor spot-checks three random drawers
- Debrief and clarify any confusion
Documentation to post on every chest:
- Laminated zone map (photo + legend)
- Monthly audit checklist (laminated, pen-resistant)
- Emergency contact for missing tool report (who investigates?)
- Parts availability info (slide replacement, foam refill, hinge repair)
Scaling to multiple bays:
- Every bay must be identical: same chest model, same layout, same colors
- Cross-bay audits monthly: a tech from Bay A audits Bay B's chest for consistency gaps
- If a tech rotates bays, there's zero reorientation time because the system is the same
8. Measure, Document, and Sustain Your Gains
Consistency isn't exciting. It doesn't sound like a story. But it's how normal people hit pro numbers every day, and it's worth measuring so you can defend the investment.
Your gains checklist (after 30 days with the new system):
- Average time-to-tool: _____ seconds (compare to baseline)
- Corrosion incidents this month: _____ (compare to six-month average)
- Tools lost or missing: _____ (compare to baseline)
- Drawer resets needed (beyond Friday routine): _____ (lower is better)
- Cross-bay tool-sharing incidents resolved: _____ (indicator of standardization success)
- Tech satisfaction score (1–5, anonymously): _____
Document this in a shared spreadsheet and share it during a team huddle. Celebrate the wins. If the numbers aren't moving, audit the audit (ask techs what's broken and fix it). In coastal climates, also review our climate-controlled tool storage guide to mitigate ambient humidity that accelerates corrosion.
Next Steps: Start Your Marine Tool Storage Audit This Week
You now have the framework. Here's your actionable path:
This week:
- Print and complete the baseline audit checklist for one bay
- Take photos of the current state (messy or not - this is your before)
- Schedule a 30-minute huddle with your team to review corrosion pain points
Next week:
- Specify your chest requirements using the material checklist
- Evaluate two to three options against your corrosion resistance criteria
- Order one new chest and plan the first installation
Week 3:
- Install the chest and set up color zones and shadow foam
- Train your first tech using the Day 1 template
- Run your first Friday reset window with the team
Month 2:
- Measure your gains against the baseline
- Hold your first cross-bay audit
- Refine the system based on real-world feedback
The path to marine tool storage that actually works isn't about buying the most expensive chest. It's about treating corrosion-resistant design, standardization, and consistent audits as non-negotiable. Every day your system runs unattended, consistency fades. Every time you invest 10 minutes in a reset or audit, you earn back an hour of throughput.
Same place, every time. That's the promise, and that's how a normal Monday in a tight bay becomes the setup every tech brags about.
Related Articles